I was going to write my own article on the subject of tuning crankbaits at some point for this site. As luck would have it while researching some other tackle I stumbled across this article at Gary Yamamoto’s Website. Visit his site by clicking this link
Crankbait Tuning Tutorial
By Russ Bassdozer
Research shows crankbaits are the most popular bass fishing lure of all. Surveys say the average bass angler owns more crankbaits than any other lure.
But one in every four crankbaits will never work well. Two will only ever be average, and only one treasured crankbait in every four will entice most all your crankbait bites.
This doesn’t apply only to bargain bin baits. Price is not a factor here. You will get lemons and lackluster performers in every bunch of high-dollar dolls too.
What is the biggest mistake I see crankbait anglers make? It is fishing with those two to three out of every four crankbaits that have little chance to succeed.
Over a season or two, say a guy buys twenty cranks. He never does too well with most of them, and he thinks crankbait fishing is overrated. Fact is, ten of those twenty lures are only ever average. Five are unadulterated duds. And the other five that have the best chance, he never tunes them to unlock their maximum potential. Maybe he doesn’t know how to tune them or what to look for when tuning them? Soon, he takes up Internet poker as a hobby that is more fun than drowning his sorry lot of crankbaits. That’s a sad story.
Like a garden, your crankbait patch needs to be pruned and groomed regularly. Lures that are not catching fish are dead wood. You need to weed them out so that more productive lures can replace them.
Inspecting the Troops
The process to separate good cranks from bad starts before you even get them wet.
Get all your crankbaits out and line them up for inspection. You’re looking to cherry pick the ones where the two body halves look glued or welded together properly, with no mismatches on the seams. Look for a neat seam seal that did not need remedial sanding or smoothing on the seam. Accept no dips or indents in the plastic, no drips in the paint, no sags in the topcoat finish. Look at the hook hangers eyelets to ensure each was seated properly in the injection mold, that a hook eye isn’t cockeyed. Make sure plastic flowed fully and formed properly around the sprue stem of each hanger. Sometimes the plastic leaves a hollow there, and you don’t want that.
| For every dozen cranks one randomly chooses, on average, three will excel, three will never work well and the other six will only ever be average. This doesn’t apply only to the bargain bin baits. Price is not a factor here. You will get lemons in every bunch of high-dollar dolls too. |
Some models of cranks, including most wood ones, are made with the diving lip glued in as a separate piece. On these, inspect both sides where the lip adjoins the body, to make sure the lip is not slightly set off to one side or another.
Now’s the time to confirm that the split rings are strong enough and swing freely. Believe it or not, some good cranks still come with soft split rings that a strong fish can pull apart as easily as sun-warmed taffy. Who knows why? Bottom line, you may need to switch out weak split rings or otherwise make sure they swing freely. If the stock or replacement split rings do not swing freely, they will impair the crankbait action. Sometimes the split rings will only swing if the short split section is positioned in the hook hanger, and that’s just not going to make it. It will distort the action. You want all parts of the split ring to be able to swing freely in the hanger. If any bind, then remove them in order to ream out the hook hanger hole. Carefully, slowly rotate the tip on an ice pick in the hole, thereby widening the inside eye diameter. Don’t loosen the hook hanger out of its socket here. Now your split rings will swing merrily.
Although it is difficult to spot this, if there are rattles or moving weights inside the crankbait, try to ensure they all move, that errant glue has not gotten on any of the rattle balls or internal ballast. This is not as uncommon a manufacturing mishap as it sounds. In a batch of twelve rattling cranks I recently purchased, two of the twelve had the large single knocker ball glued upside the head. Needless to say, they did not rattle. They just rolled over and played dead. That’s a bummer. Keep in mind, these are not defects per se. It’s just how cranks are made. When you need to glue the two body halves together to ensure a watertight seal, with free-rolling parts inside, a certain percentage of them are going to get glue on them.
Carefully cup the hooks in your hand so you don’t get stuck, but also so the split rings and hooks don’t tinkle. Shake each crank one by one, listening closely to the rattles. If any crankbaits sound odd, hold them up to the light. Most often, rattles will appear as if a dark shadow-like spot inside. If any of the dark spots do not move, chances are, they are glued there. You probably don’t want to use these, surely not in that championship tournament.
Any anomalies, no matter how slight, they are symptoms or signs right from the start that these crankbaits are probably not likely to be your top performers.
Now take the cranks that passed muster – the ones that passed your preliminary inspection and in the next section, I will tell you how to test swim and tune them to maximize their potential.
The Swimming Team Try-Outs
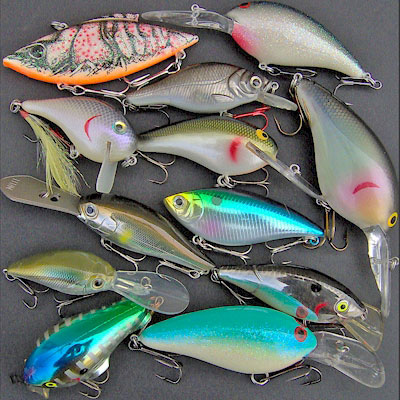
Can you spot the underperformers in this dozen? How about those rare few treasures that will catch more fish than the others? Actually, these are trick questions. You have to test swim crankbaits when not fishing in order to see the differences between them. It is a motion thing – not something that can be seen when they’re not moving. You’ll need to develop a trained eye and experience to tell them apart while they’re swimming in the water.
There is no clear reason for it, but on average twenty-five percent of crankbaits may never catch fish well. Half of them may only be average fish catchers. The other top twenty-five percent of your crankbaits are going to catch most all of your fish.
So far, we identified what to look for in a crankbait before you even get them wet. Now let’s put our cranks through step two, the test swim.
It’s best to test swim cranks in a swimming pool or on a body of water where you have no chance to catch fish. It takes your mind out of fishing and catching mode. There are no distractions, no couple of casts at that bush just to keep them honest. No running down the bank to chuck one at whatever made that huge swirl on the surface. A swimming pool provides the perfect clinical environment to test swim crankbaits. Of course, you don’t want to leave any hooks around. So be careful.
The first test swim is simply to see if your cranks swim straight, and to attempt to tune them if they swim off to one side or the other. You are still in triage mode here. The test swim is to separate cranks into three piles:
- Some cranks you pull out of the package are going to swim true just like that. No tuning required. These are rarities and will probably prove to be exceptional crankbaits. You can almost tell right away which ones are going to be great fish-catchers.
- Most crankbaits require some tuning work. There is a correlation between the time it takes and the fish it will catch. It seems the faster and easier a crankbait tunes – the better a fish-catcher it will be.
- Some crankbaits behave very moody, meaning they need a lot of time and work to tune them. They’re probably going to be vexing, moody and less productive fish-catchers too. You may find they won’t hold their tune long either, meaning they go out of tune easily after a few fish. You probably don’t want to use these, surely not in that championship tournament.
If a crankbait runs off to the right or left, swim it two or three times to gauge how bad it is off. Once you get a sense for just how off it is, or put another way, how much you’ll need to adjust it, now you need to hold it up, take time out to inspect it from varying angles. It could be one of the belly or tail hook hangers are off center. Try righting them first, if they look askew. Usually, you want these components to be straight. A misaligned belly or tail hook hanger usually will not throw a plastic crank too far off tune. On wood cranks however, belly or tail screw eyes and even belly weights inserted off-center can be career-ending injuries for a wood crankbait. There’s often no way to right a wood bait that is off on its screw-eye hook hangers or belly weights. You’re screwed (pun intended).
There are times that adjusting the belly and hook hangers will bring a side-swimming crank back into compliance. So always attempt to align them first. Take your time to inspect the lure’s component alignment. If you overlook an askew hook hanger, it means you have to overcompensate bending the critical line tie eye to make up for an errant hook hanger. Kind of two wrongs not quite making a right. So take time to make certain it’s not a hook hanger that’s off before you start bending the line tie eye.
Most often, it will prove to be the line tie eye that you need to bend to correct a side-swimmer. Step back and take an objective look at the line tie eye from several angles first. Try to verify that the line tie eye is indeed off or try to identify what may be making the bait swim off to one side before you go bending the eye. If you can’t see a reason why the bait’s off, don’t fix it. Look at the hooks, split rings, take the hooks off and put them on rotated 180 or the “other way” and consider any other options to possibly correct the action before you bend the eye.
If you can confirm that the line tie is off or observe some other reason why the bait is canting to the side (an anomaly on one side of the body or a mismatched seam), go ahead and make the correction to the eye. On cranks with diving lips, you bend the line tie eye to the opposite side of the list (deviant direction of swim). This is a tricky operation since you risk loosening the eye out of the plastic, and ruining the crankbait completely. So do it slowly and more with nudges and gentle squeezes than with hard twists using a needlenose pliers. The less times (and more gingerly) you bend the line tie eye, the less risk of loosening it.
Make no mistake, this is grunt work, and most anglers, even good ones, don’t do it. Also, it’s just about impossible to do it right while you’re actively fishing. If you’ve been reading along, by now you realize that crankbait tuning takes time. It’s not the glamorous side of fishing, but it is the tedious homework (pool work or dock work) you need to do if you truly desire to be the best crankbaiter in town!
Some cranks you pull out of the package are going to swim true just like that. These are rarities and will probably prove to be exceptional crankbaits. The crankbait shown here swam perfect with no tuning required. In it’s time, it had helped win several local team tournaments. Crankbaits like these will become your most valued lures, the revered warriors that have been scruffed and scraped by countless bass.
So far, via test swimming and careful observation, we’ve separated the good from the bad from the mediocre cranks:
- THE GOOD. With a permanent black marker, put a dot on the noggin of the good ones to identify them. If you have two or three good ones the identical model and color, put one, two or three dots on each, so you can tell them apart, and thereby keep tabs on which one did or did not catch what. Otherwise, you will confuse the three of them over time. The dots do not need to be big, and usually blend into the paint scheme. If you fear the dots will wreck your color pattern, then dot them differently – under the chin, behind the gill or on the lip near the line tie eye. These are the cranks you will be using most, especially at crunch time. We don’t know why certain crankbaits work so well, but bass are selective toward them. So it is vital to be able to tell one good crank from identical others.
- THE BAD. You probably don’t want to use these. It’s hard enough to catch bass on good well-tuned lures. It’s almost impossible to catch fish on poor lures. This is the most difficult part for many guys – to never use a new crankbait, and if you are married, your wife will never understand this. A feeling of anxiety or apprehension often accompanied by depression comes in here. Most guys just cannot buy a crankbait and then not use it. Can you?
- THE MEDIOCRE. Half your cranks will fall in this category. They’re not bad, yet they’re not good either. In the next section of our crankbait tuning tutorial, we’ll present ways to tune these mediocre cranks up a notch or two on the productivity scale.
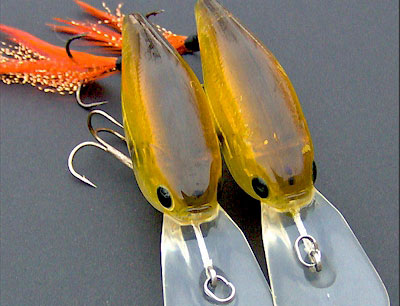
Look closely to see the black marks made between the eyes of these two identical baits in order to be able to identify and tell them apart. If you do not uniquely identify each one, it’s impossible to otherwise recall which one caught what. These baits tested better than and went on to catch more bass than ten of their otherwise identical counterparts combined. We don’t know why this is so, but bass do.
If you’ve been reading along and tuning all your crankbaits, then you should have three piles by now:
- You’ve marked and set aside the good ones from your test swim sessions.
- You’ve hopefully buried the bad ones out back.
- Let’s do some hook tuning on the mediocre now.
Tuning into different hook styles and sizes can bring out even better action in some crankbaits.
At first, crankbait hook alternatives may sound uncomplicated since size 2, 4 or 6 treble hooks are the three main sizes suited to bass crankbaits. You can even go so far to generalize that:
| Hook Size | Lure Range |
| #6 | Fine for small lures in the 1/4 oz size range |
| #4 | Medium size 3/8 to 1/2 oz crankbaits |
| #2 | Apropos for larger 3/4 to 1 oz crankbaits |
Granted, there are some swimbait-sized crankbaits with larger #1 or 1/0 hooks and some crappie-sized cranks with smaller #8 trebles, but these are not in the mainstream of everyday bass fishing for most anglers. For most, 6, 4 or 2 trebles prove cromulent hardware for small, medium or large cranks respectively. Basically, large cranks sport #2, medium cranks hang #4 and #6 for small cranks.
It gets complicated however, when you realize there are several different hook brands and multiple treble hook models within each brand that are all size 2, 4 or 6 – no two the same! There is no standard in hook sizes, strength or shape, even within the same brand. Some have thicker or thinner wire diameter, longer or shorter hook shanks, round bends or turned-in bends.
As you become more adept at crankbait tuning, you will begin to see subtle differences in what one hook does to a crankbait’s action versus another. A different hook model will never make a radical difference, but it can add that certain ‘je n’ai sais quoi’ that turns the fish catching ratio in your favor.
Don’t hesitate to experiment with hooks. There’s a popular impression that a crankbait manufacturer painstakingly matches a crankbait to work best only with one certain specific set of factory-installed hooks. That’s poppycock. True, sometimes a manufacturer nails the hooks, and you just can’t find a better choice. But far more often, a wide range of different model hooks may be used, some of which produce better actions. So don’t get hung up (pun there) on the hooks installed at the factory.
A round bend versus a wider gap turned-in barb, longer versus shorter shank, thin versus thick wire gauge. All these nuances influence action, and you may see something you like in the action given by one hook configuration that doesn’t seem to be there otherwise.
In describing different hook properties, vendors often use words such as ‘extra’ to describe a hook that is longer or shorter in the shank. They also use ‘extra’ for example to describe strength of a hook that’s extra fine or extra strong or 2X or 3X strong. Also ‘extra’ wide and so on. Different vendors use their own particular words or expressions for the hook strength, shank length, etc.
What this means is, if you are not entirely happy with the stock hooks on a crankbait:
- If you feel stock hooks are too short and too close to the body, then you can go to a longer shank to extend and expose the business end a little further out from the bait body.
- Conversely, if you feel stock hooks are too long and tangle each other, then you can go to 1X and/or 2X shorter shanks in the same numeric size (2,4,6) to minimize or eliminate hooks tangles.
- If you feel hooks are not strong enough on a particular bait, you can also go up one size (from 6 to 4, or from 4 to 2) at the same time going down in shank length (to 1X or 2X) to get a stronger hook while not adding excessive weight or length.
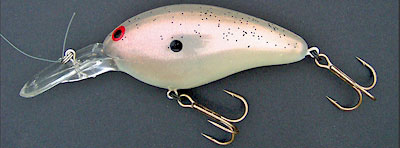
For most of the large ‘power fishing’ type crankbaits that US anglers prefer to throw, changing hooks will not easily throw these big baits in or out of tune or change the balance, and there’s a wide range of hooks that will work.
On some of the lighter or more delicately-balanced lures, particularly the tightly-engineered Japanese ones, you have a narrower range of hook options – but still room for experimentation. An issue here is many of the precision Japanese baits are calibrated to produce their best actions with trebles smaller than desired by an American bass angler. Upsizing trebles, one can run into trouble since traditionally trebles skip sizes from 6 to 4 to 2. At least one hook maker, Gamakatsu has filled in the “treble gap” by introducing sizes 3 and 5. These in-between sizes provide the serious crankbait tuner with even more options to uncover a winning hook configuration.
Hook-tuning a crank, you’ve also got to take into consideration the strength of the rod, reel and line you’ll use with it as well. Again we can generalize:
| Hook Size | Gear Grade |
| #6 | Ideal for light to medium 6-8 lb test tackle |
| #4 | Best for M to MH gear with 10-12 lb test |
| #2 | Suited to 14-20 lb test gear |
So if you find that big bass are hitting a small 1/4 oz crank that has #6 hooks, and due to the bigger size of the fish, you find it prudent to use 10-12 or 14-20 lb test tackle, you can preserve the #6 hook size, but amp up to 1X, 2X (10-14 lb) or 3X (14-20 lb) strong hooks to match the gear and the size of the quarry.
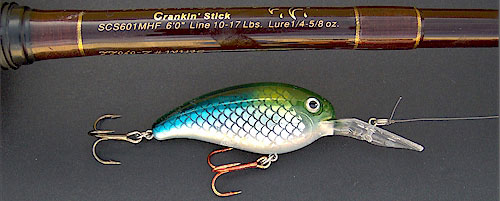
Gary Yamamoto’s Crankin’ Stick Model #24-60-MHF. You must match your crankbaits and their hooks to your gear (rod, reel, line) and to the cover and the size of the quarry. Yamamoto’s Crankin’ Stick is a totally different concept than most other crankbait rods. It’s a pretty beefy crankbait rod. It’s not the traditional soft action crankbait rod.
Not only would you want to tune hooks to the lure size and gear grade, but also the cover or fishing conditions in general:
| Hook Size | Cover/Snagginess |
| #6 | Open water, relatively obstruction-free |
| #4 | Moderate cover |
| #2 | Fishing tight to heavy cover |
Also in snaggy cover, it’s often beneficial to go down in shank length, such as 1X or 2X short shank. This puts the barbs closer to the belly of the bait, and the lure body serves as a shield to let short shanks come through cover better.
On the other hand, in open water or any time you’re having trouble hooking fish, you may want to consider 1X or 2X long shank hooks. That seems to get the hook points further away from a crankbait’s body, out into the clear where they are more apt to snare a striking bass.
The above are all just generalities, but hopefully you see some sort of hook guide emerge from the examples thus far.
If you use braided line, you are going to start at 3X strong and you will need to fish with crankbaits that are built strong enough to withstand the forces of powerful superlines. Not all cranks or hook models can withstand that pressure. Hooks can straighten, split rings uncurl, hook hangers or line ties can pull out and lure bodies snap in two if not suited for braided line. There are different hook (and lure) considerations for braid versus fluoro or mono.
The hook hangers molded into a hard plastic bait, which are typically figure-eight or hourglass shaped stainless wire eyes will determine how big you can go with hooks (and how heavy a rod/reel/line you can use). Thicker diameter wire hangers molded deeper into harder plastic baits will be able to handle bigger hooks without pulling the hangers out on a big fish or tough snag.
And if the hook hangers themselves prove stout enough, then the split rings may become the weak link. An undersized split ring could uncurl under pressure if it is mismatched for this bigged up approach.
On the other hand, you can be overgunned too. A 3X strong hook would be difficult to set on any gear when there are predominantly smaller 1 to 2 pound fish, for example. There’s just not enough fish resistance to set heavier wire hooks.
This brings us to the dual role (offense and defense) that needs be performed by a good treble hook
Like an MMA grappler, a hook is on the offensive during the initial strike phase when it must perfect a good hold (collaboratively with one or more other trebles on the bait) and during the ensuing fight when it (they) must maintain a good hold on the fish.
The defensive role is that it retains sharpness, doesn’t roll the point on initial contact, or break, straighten or otherwise weaken during the fight or throughout its overall useful life. Much of the defensive role of a hook is innate, defined during its manufacture – the type of point, the hardness, tempering, forging and alloys, wire diameter, plating finish and so on.
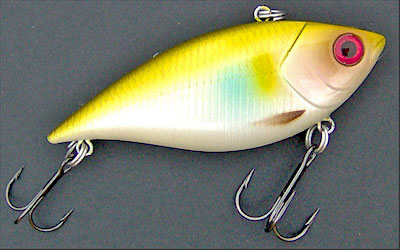
For some obscure reason, many lipless rattling crankbaits come with factory-installed #4 belly and #6 tail hooks. Most anglers misconstrue this to mean this hook set works best. After all, if the manufacturer installed them, there must be some bona fide reason. Bass, on the other hand hit these lures as good or better with a pair of #4 trebles, and many top pros step up to a #2 belly and #4 tail hook, winning major events that way. So don’t think there’s any special magic about what hooks a lure has installed at the factory.
Other things being equal (translate that as long as bass still bite it), big up your hooks as much as possible. It is amazing how a bass can smack a bait festooned with hooks, and still not get stuck on them. Keep in mind that bigger hooks may also marry or tangle each other more often, and in the final analysis, that may be a reason not to big up hooks on a particular crank if they’re going to constantly marry on every second or third cast. Ideally, you want to big up hooks to the point that they won’t marry very easily or often.
Bigging up the hooks will affect the lure’s action and movement as follows:
- Lipless. Bigging up the hooks on lipless usually will not affect the action or how many strikes you get on lipless.
- Lipped Cranks. The action of billed cranks is a little more sensitive to bigger hook size. A billed crank may not always wobble as well with bigger hooks. So you need to decide if changing hooks affects a crank to the point that the crank gets less bites with bigger hooks on it. Often, even though the action changes or seems less, bass still bite. You just need to gain new comfort whether bigger hooks will catch just as many fish as before.
Bottom line, you’ll hook and hold more fish with bigger hooks, keeping in mind the caveats about hook hangers, split rings and marrying above. And the last word on this, bigging up often means thicker, heavier hook wire diameter. So you may need to switch hook brands or models to a finer wire in a bigger hook size, in some cases, to keep the hook wire strength (therefore hooksetting resistance) matched to your gear.
That’s all about hooks.
In this final section, let us talk about the high pressure stress test first. Once you’ve tuned your worthwhile cranks to swim well at more or less ordinary retrieve speeds and optimized their hook configurations, the final exam is to test swim them as fast as you can turn the reel handle. This is the final confirmation they are tuned and balanced to swim properly. Any cranks that squeaked by the earlier tests with barely passing grades, they will flunk out at this point.
On the other hand, those cranks that still exhibit straight, symmetrical side-to-side swimming action even under the high speed stress test, take them fishing with you. Leave the others behind.
Between trips, you need to re-swim, re-tune and re-evaluate the crankbaits that caught fish for you on your last trip. Catching many or even just a few bass on a crankbait can undo it. If it’s undone, no matter how good it did last time, you may need to replace it. Most guys cannot get themselves to do that. It’s really hard for the average guy to let go of a crankbait, especially one that caught him several dozen fine fish. Yet all good things must come to an end, including magical crankbaits.
There is nothing you can do to revive the productivity of undone lures. The only thing to do is to honor them. Hang them on the mantlepiece in the fishing den. Then break in new crankbaits – new top performers.
It takes a cold disposition and a trained eye based on experience to tune new cranks and spot previously tuned cranks that have been ruined by fish. But that is how the game gets to be played at the highest level.
To sum up what we mean by tuning, it is carefully adjusting whatever can be adjusted – line tie eye, hook hangers eyes, hook sizes and styles so that a crankbait “swims better” than it did before. Some crankbaits will do this – “swim better” than others. Who knows why.
By “swimming better” we mean maximizing how much a lure’s movement looks natural and alive while minimizing how much it looks mechanical and man-made. It’s a motion thing – not something that can be seen when it’s not moving. You have to test-swim it when not fishing in order to see this.
Once you understand how this good-average-bad phenomena we’ve been reading about applies to crankbaits, you will more easily be able to spot it in all lure types – wood, hard plastic, buzzbaits, spinnerbaits, leadhead jigs, spoons – even ten plastic worms in a bag may have relatively better or worse chances for success than the others. Don’t get hung up trying to get your money’s worth out of underperforming lures. It is a waste of your time to fish them. Learn how to recognize and fish with the good ones. Realize when you’ve got a dud on the end of your line. It’s not easy to spot them at first, but with a little experience, you can do it.
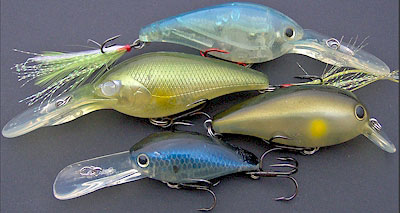
These four crankbaits look deceptively ordinary – about as ordinary as Clark Kent, that is. Each has a Superman side that can’t be seen in a photo. For over ten years, each has caught bass when their counterparts couldn’t. These are the kinds of crankbaits you want to have your bag filled with. Lures that never go out of tune, that keep on catching, and finally do so well that you reserve a special place for them to be used only in case of emergencies, like when big fish are biting, or when you need that one kicker to propel your five fish limit over the top!
Change the hooks often whenever necessary. Definitely put the very best hooks on these. Don’t try to save there. It costs more money, but these are the ones that will bring home the bacon, the bragging rights, and help your chances of winning.
